BLOG · TRANCE IN LOGIC PRO
How to make trance
in Logic Pro.
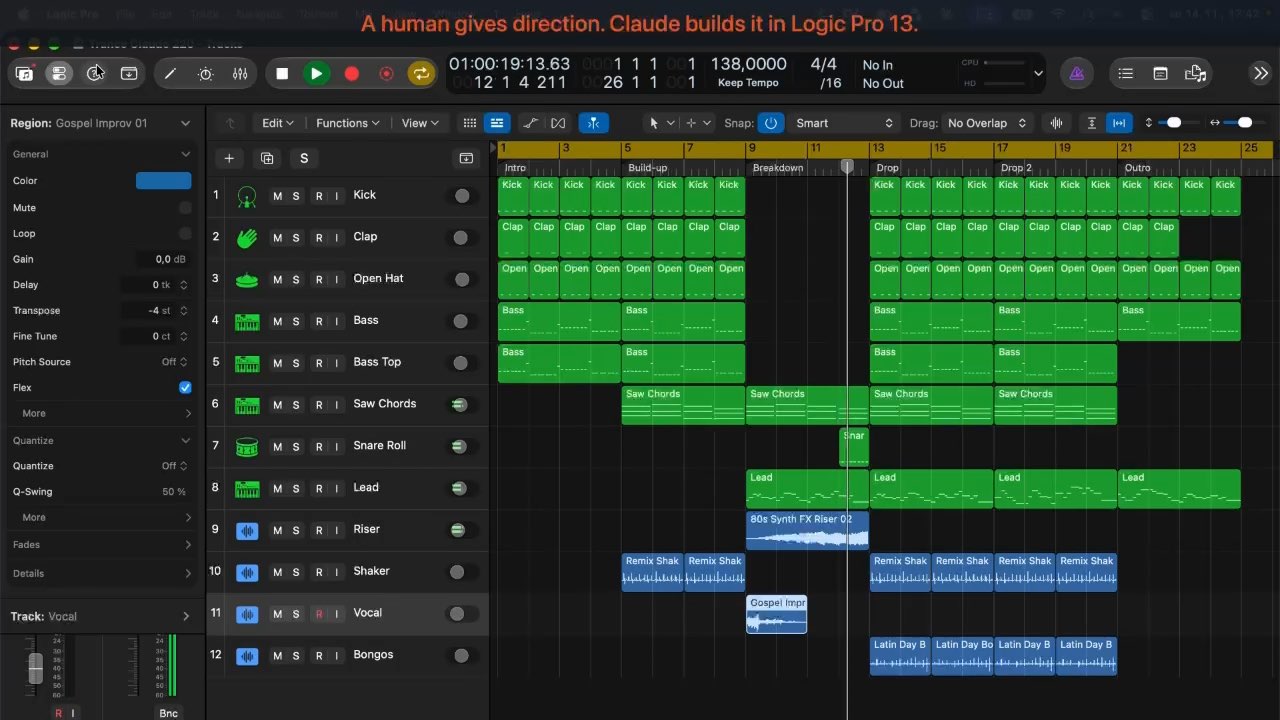
Trance is about tension and release: a rolling groove, arpeggios, wide supersaw chords and a breakdown after which everything returns at full power. Logic Pro has the synths and effects for it. This guide goes from tempo to arrangement and shows the real workflow with an AI assistant, the same one we used for our trance demo.
Updated 18 November 2026 · Dada Vibe
Tempo and key
Uplifting trance most often runs at 138 BPM, progressive trance more like 132 to 136, psytrance around 140 and up. Choose a minor key; harmony in trance is emotional and melody matters a lot.
Kick and rolling bass
The kick plays on every beat. The bass fills the sixteenths between kicks (for example three notes between two hits) and follows the chords. Duck the bass with a sidechain from the kick so they do not overlap. An off-beat open hat and a clap on 2 and 4 complete the groove.
Supersaw, arpeggio and lead
A supersaw is several detuned saw waves in unison. In Logic build it in Alchemy or ES2 with unison and detune. Play the chords long as a pad, an arpeggio in sixteenths (for example root, third, fifth, octave) and the lead melody on top. Reverb and delay add width. Rhythmic pumping on pads with a gate or sidechain is a stylistic choice, not a rule.
Breakdown and build
- Intro (16 to 32 bars): kick, bass, percussion.
- Build: arpeggio and an opening filter.
- Breakdown (32 bars): no kick, pads and melody, emotion.
- Build-up: snare roll, noise, filter and volume automation.
- Climax: everything in with the main melody, then the outro.
Mix
- Cut the low end of pads and supersaws so the bass range belongs to kick and bass.
- Give width to pads and effects, keep the low end mono.
- Reverbs through aux buses so you can automate them in the breakdown.
Trance with AI in Logic Pro: the real workflow
With Dada Vibe Connector you work with an AI assistant (Claude, ChatGPT or Copilot) right inside Logic. The AI writes editable MIDI, loads instruments and effects, sets plug-ins in Hz, dB and ms and draws automation. After every step it reads the result back. You listen and say what to change. This is what a typical session looks like.
1. Reference: analyse a track
Start with a track you like. The connector analyses a local file or a public preview of a track you name: it estimates tempo and key and measures tonal balance, saturation and loudness. The AI takes inspiration from it and never copies melodies.
- “Analyse [track] and tell me its tempo, key, tonal balance, saturation and loudness.”
2. The skeleton in one request
You can give the skeleton at once, as a batch of steps. The AI carries them out one after another and checks after each what really happened in Logic.
- “Using the reference, set 138 BPM and the key, write a four-bar groove with a kick on every beat and a rolling bass between the kicks with sidechain, a supersaw pad with four minor chords on a new track and a sixteenth-note arpeggio on another. Do not copy melodies from the reference.”
3. Listen and change
Now you listen. Whatever you do not like, say in plain language. The rest of the track stays as it is.
- “The arpeggio is too busy: change it to eighths and add delay.”
- “Give the pad more width and reverb and keep the lows mono.”
- “Put a compressor and light saturation on the bass so it comes through.”
- “Draw the build-up: the arpeggio filter opens over 16 bars, with a snare roll in the last 4 bars.”
- “Build a breakdown without the kick at bar 65 and the return at bar 97, and label the sections with markers.”
4. Mix and output chain
- “Balance the track levels and cut the low end on everything except kick and bass.”
- “Put an EQ, a glue compressor at 2:1, width on the highs only and a limiter with a −0.3 dB ceiling on the output, and measure loudness.”
- “Compare loudness and tonal balance with the reference.”
Each step takes tens of seconds to a few minutes, and the musical decisions stay with you. Export only once you are happy with what you hear.